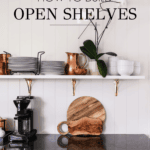
DIY Open Kitchen Shelving
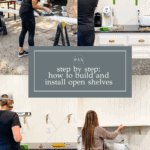
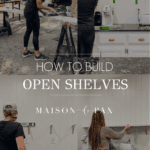
Wondering how to build and install open shelving in the kitchen? Don’t miss this step-by-step tutorial for DIY open shelves!

Open shelving can have pros and cons. The pros? It’s affordable, functional, and – when done well – beautiful. The cons? Open shelving can collect dust and clutter. But I’ve been living with my DIY open shelving in my kitchen for five months now, and there is no doubt that the combination of beauty and function is just what our kitchen needed.

Updating a 1980s Kitchen
I wasn’t a big fan of the kitchen design when we moved into our new home a couple of years ago. But fortunately, updating a kitchen doesn’t have to mean a full kitchen remodel or all new kitchen cabinets. Sometimes, some smaller projects—like replacing outdated closed cabinetry or cabinet doors with elegant open shelving—can transform the space.


For more details on the kitchen updates we’ve made, check out these posts:
- How to Build a Cabinet Over a Fridge (and yes, we swapped the fridge and lower cabinet)
- How to Install a Vertical Plank Wall
Now, if you’re looking for a way to add both charm and function to your kitchen, this guide will walk you through exactly how to build and install open shelving, including tips on materials, installation, and finishing techniques.

Why Choose Open Shelving?
I think open shelving is a perfect way to modernize an outdated kitchen while still maintaining storage. Unlike upper cabinets, which can feel heavy and closed off, open shelves create a more spacious feel, which we needed in this space. Although this is not a small kitchen by any means, figuring out our kitchen storage space has been a little tricky.
Originally, our trash had to live in our little pantry, and our everyday dishes lived in our island. But I decided to install pull out trash cans in my island. So open shelves seemed a great alternative while maintaining the more open feel we wanted. Now our everyday items are within easy reach.

To lean into the classic look I wanted, I chose elegant unlacquered brass brackets both for sturdiness and aesthetics. The result is a collected-over-time look that blends function and beauty seamlessly. I think it makes our kitchen feel timeless.

This post contains affiliate links. Click here to read my full disclosure.
Materials You’ll Need
- Wood for the shelves (I used a sturdy, solid wood board for durability): at least 9.5″ deep if you want it to hold dinner plates and as long as you want (I made mine the entire wall)
- Unlacquered brass shelf brackets (I used these in 8″ and they come with hardware)
- Primer + high-quality paint or stain (I used Sherwin Williams Emerald Urethane for durability)
- Stud finder
- Level
- Drill and screws
- Wall anchors (if needed)
- Measuring tape
- Sandpaper
- Paintbrush or roller
- Other sources: knobs, pulls, and cup pulls (all unlacquered brass), door handle (Turino lever paired with Wilshire sideplate, French Antique finish)
Step 1: Plan and Measure
Before starting, decide on the placement of your shelves. I recommend measuring the wall and determining the height and spacing based on what you plan to store. If you’re replacing upper cabinets, consider using similar spacing so the new shelves feel intentional rather than like an afterthought. If you have any countertop appliances below, be sure you leave plenty of clearance. Most of the time, 20″ of backsplash height above the counter is sufficient.

Use painter’s tape to mark where the shelves will go. Step back and visualize—this helps ensure the proportions feel right. Then you’re ready to purchase and gather materials.
Step 2: Locate Studs and Install Brackets
Using a stud finder, locate the wall studs where you plan to install the brackets. It’s best to screw the brackets directly into a stud for maximum strength. If your ideal shelf placement doesn’t align with the studs, use heavy-duty wall anchors to secure them.

Installation Tips:
- Mark the stud locations with painter’s tape or a pencil.
- If installing into a stud, use long wood screws for a secure hold.
- If installing into drywall, use heavy-duty anchors rated for at least 50 lbs.
- Use a level to ensure the brackets are aligned before drilling.
- Secure the brackets firmly to the wall, checking again with a level before proceeding.
Step 3: Prepare and Paint the Shelves
To maintain a cohesive look, I painted my shelves in the same color as my vertical plank wall. Both are Sherwin Williams Alabaster – a beautiful creamy white. This creates a seamless transition and lets the unlacquered brass brackets stand out beautifully.

Painting Tips:
- Sand the wood lightly to smooth any rough edges.
- Apply a high-quality primer if your wood isn’t pre-primed.
- Use Sherwin Williams Emerald Urethane for a smooth, durable finish.
- Apply two thin coats, allowing each coat to dry fully before applying the next.
- For an ultra-smooth look, use a foam roller or high-quality brush.
- Be sure to let the paint fully cure (which can take up to 30 days) before heavy use. To test if it is fully cured, dig your nail into the paint. If it doesn’t make a dent, the paint is probably cured.
Step 4: Install the Shelves
Once the brackets are secured and the paint is dry, it’s time to install the shelves.

Installation Steps:
- Place the shelves on top of the brackets.
- Use a level to double-check that they are perfectly straight.
- Secure the shelves to the brackets using screws (if your bracket design requires it).
- Step back and admire your work!
Step 5: Style and Enjoy!

Now for the fun part—styling your new open shelves! Here are some of my favorite tips:
- Mix function and beauty: Store everyday essentials like plates and glassware alongside decor like houseplants, vintage bowls, or pretty antiques.
- Layer textures: If there’s room, stack dishes, lean cutting boards against the wall, or add woven baskets for warmth.
- Stick to a cohesive color palette: Keeping decorative items in a similar color family ensures the shelves look curated rather than cluttered.
- Use frequently: Don’t be afraid to actually use your open shelving—it’s meant to be functional as well as beautiful!

Final Thoughts
Installing open shelving in the kitchen is an easy yet high-impact update. Whether you’re removing outdated upper cabinets or just adding a little extra storage, this project brings both charm and function to your space.

By using high-quality materials, securing brackets properly, and finishing with a durable paint, your shelves will stand the test of time. I love how this simple update transformed my kitchen, and I hope this guide helps you create a space you love, too!

Looking for more open shelving kitchen ideas? Be sure to check out the other spaces below.