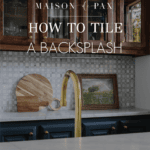
How to Install Tile Backsplash Using Musselbound
Looking to update or add a backsplash to your kitchen, bath, bar, or laundry? Find out how to use Musselbound tile adhesive mat for an easy, beginner friendly installation.

A few months ago, I shared on Instagram the excitement of my first tiling job as I added a backsplash to our wet bar area… Then this happened:

Yes, I had completed my first tiling job, only to discover it the next morning in shambles. Fortunately, the tile wasn’t damaged, and I was able to discover what I did wrong… Which helps me tell you exactly what to do to successfully use the Musselbound adhesive product.
And don’t worry, I tell my kids that DIY projects are like life: when you fail, you pick up and start again… smarter and wiser. 😉 So the second time was a charm:

Musselbound vs Thinset or Mastic
Traditionally, tile is attached to the wall (or any surface) using either thin set mortar or mastic. Both are a glue-like substance that you smear onto the tile and the wall and then set in place to dry. Both are messy, though, and take some finesse.
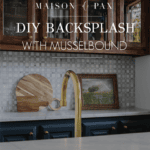
So when I first learned about using an adhesive product instead, I was excited to try it. I’ve been eyeing Musselbound adhesive tile mat for a few years now, and I finally had the perfect project. We’ve been working on our home bar area; it started as an orange oak and cultured marble 80’s relic… but I love how we’ve modernized it so far.


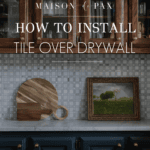
I wanted to add a backsplash as a focal point, and Musselbound works over exisiting tile, cement board, plywood, and even painted drywall (which is what I was working with).

How to Install a Tile Backsplash using Musselbound
This post contains affiliate links. Click here to read my full disclosure.
Step 1 – Gather the supplies
You will need the following:
- Musselbound tile adhesive mat (with spacers)
- utility knife and scissors
- cutting board
- level
- tile of choice (I used this marble mosaic tile)
- grout of choice (I used this product, also available on Amazon) + grout float and sponges
You will also want to make a plan for your tile layout. A dry fit run is a good idea.
Step 2 – Prepare the surface
This was where my first mistake lay: I did not clean the (seemingly) clean drywall before beginning the project. Don’t skip this step!
Use some kind of all-purpose degreaser to clean the wall of any dirt, dust, grease, or oils. Let it dry completely. Then protect your counter, as needed.

Step 3 – Install the adhesive
Starting in one corner from the top of wall, line up the adhesive side of the mat against the wall and roll downward along the wall. When you reach the bottom, slide your cutting board underneath (to protect your countertop) and use the utility knife to cut the mat. Do NOT remove the liner yet.

You could measure your kitchen backsplash height (or wherever you are installing your tile) and cut the mat before installing if you prefer, but don’t let the sticky side of the mat touch anything before it touches the wall. This will ensure a better adhesion.
Place the next column of Musselbound tile mat directly beside the first with tight seams (do NOT overlap). Continue working along the wall, trimming the mat, as needed. Make sure your utility knife has a fresh blade for smooth cuts. I preferred scissors for cutting out around outlets.

Once all the mat is in place, press it firmly into the wall. I used my grout float to do this.
Step 4 – Lay the tile
Note: If your tile is dirty or dusty, you will need to clean it before application. Also, wet tile will not stick to the Musselbound, so if water is needed to clean it, you will need to let it dry before installing.
Make a plan for your layout. If you need the tile pattern to be centered, you may want to start in the center. Working in small sections, peel the release liner off the Musselbound and press the tile firmly against the adhesive. Use your level to ensure that the tile is aligned properly, and use the provided spacers to space your tiles as desired.


It really is as simple as peel & stick! When you are certain the tile is in the right place, press firmly to activate the adhesive.

Warning: if you have to cut your tiles with wet saw, you will need to let the tiles dry before you can install them. I fortunately chose a mosaic that allowed me to simply cut along the backing to make the tiles fit the space, so I didn’t have to worry about that. But I have heard that a hair dryer can help speed up the drying process if that is an issue for you.


Remember, apply firm pressure to each tile to create the permanent bond.
Step 5 – Grout the tile
One advantage to this product is that you can grout immediately (whereas you have to wait for thin set or mastic to dry). I am going to cover grouting tile in a separate post, but suffice it to say that Musselbound recommends grouting within 24 hours, as the grout helps to secure the project.

Musselbound FAQs
Can you put Musselbound over existing tiles?
Yes! I would not recommend it over a heavily textured tile, but Musselbound can be applied over an outdated smooth tile job.
How do you prepare walls for Musselbound?
Clean them! Even if you don’t think they are dirty. The first time, I didn’t, and I regretted it. The second time, I used a common all purpose degreaser cleaner. Then I let the wall dry fully. If you had any spackle or other dusty material, be sure to prime that and let the primer fully cure (see below).
Why is Musselbound not sticking to the wall?
There are three common potential causes:
- Your primer or paint is not fully cured. Paint takes mere hours to dry to the touch, but most paints take 1-2 weeks to fully cure. Wait at least that long before using Musselbound on a freshly painted surface.
- Your wall had dust or grease (that may not have been visible). I believe this was my problem.
- You did not press the Musselbound hard enough to activate the adhesive. A gentle press will cause it to stick enough to look like it is holding, but you want to press firmly to be sure that the adhesive has fully activated so the heavy tile won’t pull the mat down.
Can you reposition tiles when using Musselbound?
Yes, to an extent. I recommend pressing lightly at first until you are confident that it is exactly where you want it. At that point, you can still reposition if needed. Try not to reposition too much, though, as this will compromise the strength of the adhesive bond.
Once you are sure, press firmly to activate the adhesive. After that, it is not possible to reposition without damaging the adhesive. If you really need to remove a tile, you can cut a new piece of Musselbound just for that spot.
Do you have to grout with Musselbound?
Musselbound does recommend that you grout your project as grout adds greater stability to the tile.

In short, I would definitely do this project again. I highly recommend it for adding an accent wall or backsplash to your space. Do you feel ready to try? Please let me know in the comments if you have any questions!


Thank you for this tutorial on using Musselbound. I had read about it a couple of years ago and I have thought about trying it. You have cleared up questions that I had so I might try it in our laundry room. Your bar looks great. Nice job!
So glad it was helpful, Jen! I enjoyed the experience after working out the process.
This is such a helpful guide! Love that Musselbound makes backsplash installation easier for beginners. Can’t wait to try this for a kitchen refresh!
I’m so glad you found it helpful!