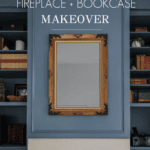
Fireplace + Bookcase Makeover
See how we transformed these bookcases on either side of the fireplace to look like a beautiful, custom unit with a stone fireplace and moody color.

I don’t even know quit what to call this fireplace and bookcase makeover… Except just what this room needed. Before, these bookcases beside the fireplace were a little awkward. Now I just love the bold statement this wall makes in our primary suite.

To be clear, these bookcases aren’t fully finished. I have some decor rearranging to do, and I’m still working to convince Mr. Pax that we don’t need giant speakers in here. 😉 But in the meantime, I wanted to share with you the full makeover process.
The Bookcases + Fireplace Before
To be clear, I LOVE that we have a fireplace in the primary suite. Even if we live in Austin, TX. I also love that there were already giant bookcases on either side of the fireplace in this room with almost 12′ ceilings. I feel very blessed.
We replaced the carpet with hardwood floors and had the whole house painted SW Pure White just before we moved in. But I opted not to have the painters do these bookcases because I was pretty sure I had more dramatic plans for them. What that left us with was a set of yellow-looking bookcases on either side of a limestone fireplace.


The bookcases actually aren’t even the same width (though I think our new look hides that pretty well). I was determined to tie them into the fireplace and give them a unified look with paint and molding.

Isn’t that a fun transformation? Let me show you how I did it.
How to Transform a Fireplace and Bookcase into a Single Unit
Materials
- skim coating supplies
- base cap molding and picture frame molding supplies
- crown moulding
- primer + paint (SW Stargazer in satin – which, as you’ll see, is a very chameleon color)
- unlacquered brass hardware
- library lights
Step 0 – Wire for lights (optional)
I actually purchased these picture lights for our previous primary suite, but when we decided we were moving before I ever got them installed, I decided to take them with me. I’m so glad I did! If you want lighting or new plugs, now is a good time to do it, before you finish the walls.
Step 1 – Skim coat the wall texture so that it looks smooth like the bookcases
Get the full tutorial here for skim coating. Suffice it to say that the orange peel wall texture wasn’t fitting the polished look I wanted for this space. So I skim coated the sheetrock above the fireplace to give it a smooth look like the bookcases.

Step 2 – Lightly sand the bookcases
No matter what kind of paint you plan to use, if you are painting existing bookcases, you should give them a light sanding. Use 150 and/or 220 sandpaper to simply rough up the existing finish. In fact, if you are repainting existing trim or cabinetry, I recommend you follow this tutorial.
Step 3 – Prime everything
New drywall mud from skim coating? Prime it. Existing bookcases? Prime them. New bookcases or trim work? Prime them, too. Just prime everything so that it’s ready for a fresh coat of paint.

Step 4 – Add trim work
This might be interchangeable with Step 3 or 5, depending on where your trim work is going and whether your new trim is pre-primed or not. Most importantly, though, you want to add trim like crown molding to tie your newly smoothed walls into your bookcases. I used this hefty crown molding and LOVE it.
Tip: Paint complex crown molding like this on the ground and then install. You’ll still need to caulk and touch up, but that’s much easier than trying to paint this tricky moulding 12′ in the air!


I also added picture frame molding to the fireplace section. Get the tutorial here.

Step 5 – Paint the fireplace and bookcase
I used SW Emerald Urethane in satin (my favorite for walls and trim work like this). I painted two coats with an angled brush and trim roller.

Step 6 – Add hardware and style
I actually removed the extra doors on the left side and added a fixed shelf to the right side to make it match the left.


I then attached the lower doors and shelves (which I had removed for painting), added these unlacquered brass knobs (my favorite simple knobs!), and installed these gorgeous picture lights.

I styled the bookcases from the boxes we still had stacked in our closet. I have some other plans for bookcases in our home, and I’ll probably rearrange again after that… But for now, I love this eclectic mix of old books, vases, media equipment, and pictures.

See here for more tips for styling bookcases.
Fireplace and Bookcase in the Primary Suite
I still have work to do on the overall space, but I am so pleased with how this fireplace and bookcase has transformed this room.

It makes the whole space feel a bit moody and dramatic without making it feel too dark or oppressive.
The icing on the cake was this beautiful Facebook Marketplace find – a vintage mirror – to hang above the fireplace. Now to find more original artwork to add to the shelves!

What do you think? Does it capture elegance and drama without overwhelming the space?


I love the look and the mirror was a great find. You always do such a good job and well thought out. Thank you
Thank you so much, Diana! I really enjoyed creating this visual space for our primary bedroom!